Supplies:
First, you're going to need some base polish for your nails. Note that there are different kinds of polish. Gel is special and requires more equipment - everything else should be easy and good for starters. (Check out this page for more! I was browsing polish, wondering what in the world Crelly was.) I think of gel based polishes that need UV curing to be more advanced. Nail polish that is quick-dry is also great for beginners to use for base polish.
You're also going to need some stamping polish. Sometimes regular polish works for stamping, but when you first starting out I recommend that you just go ahead and buy some stamping polish. It dries much faster and makes the process easier to learn and be successful at. Maniology's black, white, and silver are GREAT for successful practice!
Next you're going to need to get yourself some top coat. A no-smear/ water-based/smudge free clear coat is what you're going to need to cover and protect the stamped art. Other types are a solvent for the polish and let me tell ya, it won't end well. It's heartbreaking to have streaks and ruined art after hours of practice without this, when you get to the last step (below).
You are ALSO going to need a lacquer/clear top coat to go over the whole nail when you are completely done. The no-smear protects the stamped art from this polish! Water soluble polish is just that, and it's not going to hold up well to daily wear unless it, too, is protected.
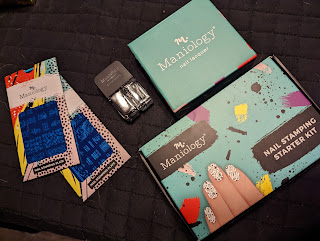
Now, for the fun part. You are going to need some plates for nail stamping that have artwork you enjoy and want to work with. To work with a plate you will need a stamper and a scraper.
Link to free Starter Kit offer from Maniology
You can get a free kit from Maniology that has everything you need to get started, which really is an amazing deal! I did not enjoy the "ice cube" stamper that they put in the kit, though. I did not have a lot of luck until I went to Amazon and purchased some other kinds to experiment with. Of course they sell them at Maniology too and they're a bit nicer. You can learn better techniques to make the cube work better for you, though: https://www.youtube.com/watch?v=PlvgFyZyHO4
To clean the polish off of your stamper in between stamping, get a lint roller or a nice wide roll of masking tape.
I usually throw a couple of paper towel sheets down under my plates while using them to protect the surface underneath. It just makes clean up more easy. Some people use a stamping mat but the paper towels catch my scraped-off paint from the plate.
Finally you are going to need some pure acetone for polish removal and clean up purposes, and some cotton balls. I will only mention this once, but it is crucially important. DO NOT get acetone into broken skin. It can cause permanent organ damage!
I also keep a clothespin in my kit to hold the cotton ball while cleaning my plate with the acetone in between stamping so I don't mess up my nails. Maniology sells a cotton ball grabber which I need to try!
Do not use regular nail polish remover on your plates. Only use pure acetone.
Do NOT use acetone on your stamper heads. It will permanently mess them up. It makes the surface cloudy, which is very unhelpful.
I find it helpful to have one more paper towel to buff off the plate after I've cleaned it, to get rid of any residue which would impede your next stamp.
Additional supplies
That's really it for the basics, although there are some other accessories you can get that help make the process more fun, once you get the hang of things.
I got a cute little set of polish movers and brushes for doing decals and more advanced stamping designs.
Here is the brush set https://amzn.to/41kL6Iv that I started off with, although I have moved on to the Maniology brush set now. The smallest brushes are the most helpful when you get the hang of reverse stamping! The fan brush can also be useful when doing advanced painting techniques.
I have found that it is much, much easier to clean my brushes in this container. I like it because it has a screw on cap to save the leftover acetone in after you're done working. https://amzn.to/3sixiRM
For cuticle care, all I ever need is a set of tools like these: https://amzn.to/3ILQPQh
The scraping and removal tools are used after I've cut and filed my nails.
I prefer metal files so I got a new set https://amzn.to/41htixZ
Additional stampers, because I don't like the ice cube that comes in the kit https://amzn.to/3IWqvmV
I recommend that you get a variety of stampers to play around with, and see what you like. Once you figure it out, you can spring for the nicer ones from Maniology.
Because I have a B vitamin deficiency, sometimes certain ones of my nails are grooved. A nice smooth surface is better to work on so I will use this tool to buff them down and make the surface more flat:
First you use the sanding side, then you move to the less gritty section and smooth it out. Finally you use the white buffer to make it shiny. You don't want to make it THAT smooth and shiny for paint prep though, because they would be too slick. (If you are unable to paint your nails for a while, you can buff them to a shine really quickly with this little gem though - they look wet/lacqured/shiny!) So I only use one or two sides for this prep. I don't do this often, because again, you don't want to thin out your nails. I only do this to bring down the ridges and even things out.
Some people are using a peel off base coat when they do their nails. I don't think this is for me though. I have heard of it peeling off some nail with it so apply it over a nail strengthening or building layer if you try it. There's also a short term peel coat but it's more for practicing then removing, not wearing it for days. It could be fun for practice, so I ordered some to give a try! Orly Peel Off One Night Stand Base Coat
A small fan can also be useful to help dry polish in between steps, but not really necessary.
I have also started to acquire quite a few plates so I bought some little booklets to hold them and keep them better organized and safe. Some of mine are from Maniology, and some are not.
I like these because they hold the normal sized plates. It can get a little tight to put backed plates in both sides of a sleeve though, so I put one plate with the backing, and one that doesn't have backing, into each sleeve for a perfect fit. I should have just bought the holders from Maniology, where I'm sure everything would fit better. Theirs will hold 16 plates. You're going to need it eventually if you find that you enjoy nail stamping.
Speaking of backs, some people like to put backing on plates that come without one. Like this product.
And that's all, for supplies!
I don't like working with gel polish because I don't want to have to wear special UV shielding gloves when using a UV lamp to cure the gel polish. I also prefer (and need) a breathable base, so I just avoid it all together. Same with acrylic nails and dipped nails for me, due to the smothering of the nail bed issue.
Helpful links:
Beginners guide https://www.youtube.com/watch?v=bw73Bq0uJhE&t=4s
Pick the best type of nail stamper for your plates. https://easynailtech.com/nail-stamper/
Watch lots of videos! https://www.youtube.com/@Maniology/videos
If your nails are small but you have large designs you want to use, try an Image Shrinking stamper head. https://www.youtube.com/watch?v=mGzXkhHecYI


0 Comments